Thursday 28 November 2013

Bunny doorstops

Now I have finished my craft fair and a few other bits and pieces it leaves me open to concentrate on projects that I have promised to friends for a long time.
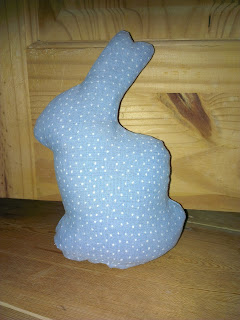
 A friend asked me a month or so ago about making my bunny softies in to doorstops.  We agreed some fabric and off I went to forget about it for ages until finally today I found some time to have a play!  Luckily I had half done this one already so no need for my sewing machine!
 So how did I do it?  I took the template that can be found here and cut out the fabric of my choice and a lining fabric.  I then made an oval out of both my lining and my choice fabric.  The oval needs to be the length of the base of the bunny from toe to tale :)

Then I simply placed the choice fabric right sides together and stitched round placing the oval between the toe and the tale.  I left a full line between the toe and the tale open on one side.  I repeated with the lining.

Then I had a bit of a fiddle - first filling the lining with rice, giving up on that and attempting to skip the lining and then going back to my original plan. So I put some rice into my choice fabric right up to the ears to maintain the shape and then slotted the lining inside. I poured in rice until it was pretty full and then I had stitched the lining closed.  I then added some extra rice into the cheeks of the bunny and around the neck to stop it from slouching down when the rice in the lining shifted position.  I lined the base of the bunny with pennies and then folded over the fabric and stitched tightly together.
This is the finished product.

To be honest once I have fiddled around some more I may well end up making my friend a new one as this is by no means perfect but as a first doorstop attempt I am pretty happy with it.  I can see why so many doorstops are one block like shape with an image sewn on rather than a shape as it is pretty tricky to shape it correctly.

In my house rice and a few coins are plenty heavy enough but if you lived in a house that had self closing fire doors I think it may not quite be enough and you would need to use something like sand that had more weight in it.

Have you got any unusual doorstops?  Or ideas for the next one I make?  Let me know :)
x
Wednesday 27 November 2013

An ode to my sewing machine

So this week has involved a lot less sewing and a lot more chilling which in a way has been nice - unfortunately my trooper of a sewing machine seems to have given up on me at last.  My parents bought me my sewing machine as a present when I was doing textiles at school.  It's a basic Toyota model and probably should have died years ago.  When I started making my wedding dress I thought for sure it wouldn't keep up but it did and slowly I did more and more projects on it. 12 years, 2 wedding dresses, 2 bridesmaids dresses, 1 prom dress and countless projects later I think it has finally died.  So it is hand stitching for me for a bit until I save up some pennies to get a new one!


I don't have pictures of my prom dress but here is a little ode to my sewing machines happy life over the last 5 years or so!  :)

Before my machine died on me I was sent a collection of odds and ends of fabric that a friend had.  This is what I sent her back!

Truly a lesson never to throw away that bag of scraps of fabric because you never know what could be dreamt up and created.  Two quilted stockings for her beautiful two children, a heart garland and two zipper pouches for those bits and pieces that don't belong anywhere .

I'll be on the look out for hand sewn projects, maybe a bit of knitting and possibly some activist cross stitching in the next few weeks!  Watch this space - as always I'll share all! 

x

Sunday 24 November 2013

SO how did it go???

When I set out to write this blog I spoke about a running, crafting and gardening combined with less time in front of the TV and more positive activity.  Looking back I feel pretty happy with how it has all gone!
 I planted some successful and some unsuccessful veg in the garden - spinach and butternuts failed but had crops of runner beans right up until last week.
 The running went great - I did the race for life and then staggered through the great south run.  Since then I have to confess I have not stepped outside for a run but I have joined a gym and have been going along and enjoying exercising in the less freezing temperatures - combined with a warm pool and working hairdryers makes me very happy.  I do like to be warm!
 The crafting has been wonderful - I have been stitching with quite some dedication and managed to gather a whole table full of stock to take along to the craft fair yesterday.

 Financially the craft fair was not a success for me to be honest - I sold a few pieces but not lots so returned home with nearly all my bits and pieces.  So what has been good?
 - Since sharing more of what I sew I have been in contact with a variety of crafty types and upcyclers from all over the world via various social media sites.  I've learnt from them, marveled at their achievements, shared some of their struggles and loved looking at all their gorgeous crafts.
 - I've made sewing a part of my life in a way that it wasn't before which means I make more things for more friends because they see me sewing things and I love doing this!
 - I met fantastic people at the craft fair
 - Doing the craft fair has given me time to think about and realize what my USP is - upcycling - and to consider how to make this appealing to others.
 - The time I spend in front of my sewing machine is simply wonderful - I sit and think, I sing along to songs, I listen to stories and generally just take time out for me to process and deal with various things going on in my head.

I think in summary it has been wonderful to move through my life in the last few months with a bit more purpose than simply ticking days off of a calendar.  By setting goals and working towards them I have used my time more wisely and done more than I had in the previous months.  By sharing my goals I feel somehow driven to achieve them by my own desire to do well.  By sharing my moments that aren't quite as successful as I would like them to be I feel I am able to hold my head higher - not keep secrets and pretend that everything went exactly as planned but instead embrace the reality of where things are at and get excited about moving forwards with input from others.  These things are all on a very small level - after all the goals I set were really just about spare time - but for me the lessons I have learnt have been so very applicable to every part of my life.

So where next?  I definitely plan to set myself more goals in the future - I think I will begin with some new years resolutions in January (more on that in a future blog).  I definitely plan to keep crafting, exercising and I have to say I have fallen in love with blogging.  It is evolving slowly into a type of crafty journal with anything I experience thrown in - but anyone who knows me will verify it never was going to be a hugely focused blog on one single topic as that just isn't how I operate!

So watch this space for a few bits in my etsy shop and some new adventures coming up!  Thanks for coming along on my journey - its ace having you on board!

Tuesday 12 November 2013

Tunic top

Today I had some unexpected free time - glorious right!  I did some cleaning - made a few bits for selling and then decided I really needed to make something fun for me!
 I was given some gorgeous Nigerian fabric by a friend of mine a little while ago and it has been sitting in my fabric stash being sadly neglected.  So I decided to have a pinterest search for some inspiration.  I have a board on there called stitchspiration and seem to pin many things on there but not actually create any of them.  I set to work making this fab tunic top which I have had on there a while back.  The picture on pinterest looked super easy and it really did take me only about an hour to complete.
 Here is the link so do pop across and like, follow or comment on this blog it is fab!

Here is my finished project


What do you think?  I like the shape and the fit is good but there are a few things I would change for me.  I think I will adapt the sleeves on this top as they feel a little big to me - I will probably just create more of a defined sleeve.  The other thing I will do if I make this again is make the bottom flare out a bit more into a bit of a dress style.  Those things really are just personal preference though!  This is definitely a pattern I would recommend - especially if you are new to making clothes it is so simple!

Send me your pictures of how you get on!

Monday 11 November 2013

New Steps

This morning I have spent some time playing around with photos and opening up my ETSY shop.  I am using this as a trial to be honest - I've heard so many mixed reviews on people's successes and failures linking in with etsy that I decided to give it a shot and try it out myself.
 I've uploaded just 4 products because I am still preparing for the craft fair that is coming up so all my stock is needed to fill the table there.  Once that is done I plan to begin uploading more products regularly and just see how it goes.

I've already realized a few things - I need to learn to improve my photography skills and to do this effectively I need to be very efficient.  I can take reasonable pictures but then I upload them and set about attempting to do a bit of editing (of course armed with google) and see my photos turn into disaster areas.  I've tried something similar before when me and my husband did a batch of screen printing - our biggest challenge by far was the editing of photos to prepare the prints.  But with some time and patience we got much better and we ended up with some pretty cool prints ( well I thought so anyway ).  So a challenge for myself - in between everything else - is to work on photos.  On etsy you can't pick up your products, touch them and imagine them in your home or wardrobe so great photos are everything.
 The efficiency thing I guess is just about realizing that your time needs to be managed really well to craft, dream up ideas, shop for fabrics, edit photos and talk to potential customers - all that while holding a full time job, staying in touch with friends and loving blogging to you guys.  Well whatever happens so far I've been enjoying every second so I figure while I am still having fun I will continue!

Anyway it is a new step in my upcycling adventure so I will keep you posted on how it all goes!

Here is the link if you want to check it out!

ETSY SHOP!!!

Have fun browsing and as always feel free to feedback - I plan to share everything from this journey I'm on - the good, the bad and the massively embarrassing errors - on this blog so feedback to me might reduce some of my red faced moments!  Enjoy and link me up with your shops too so we can help each other out!

Tuesday 5 November 2013

Slippers!

As the weather has started to turn colder I realized that my slippers are well and truly worn through.  So I decided to make my own.  They turned into more lined slipper socks than actual slippers with a sole but to be honest I'm pretty happy with them!  I realize more and more that I love turning something that is previously useless into something cute and useful.  I bought a cardigan from a charity shop for £2 some time ago.  I loved it but despite taking care to put it on a woolen cycle at a low temperature I managed to shrink it to the point of looking ridiculous when I attempted to wear it.  The shrinking had made the wool kind of felt like so I decided this was my perfect slipper material.

So this is where I started and where I ended up.


So how can you make your own?  To be honest this really was a simple project - I didn't measure anything and simply used the shape of my foot as a guide - not so helpful if you want to make them as gifts but for this project it was perfect for me.


1. I chose a lining fabric - I used a stretchy t-shirt fabric that I had - and fold over your foot pinning along the bottom.  The fit should be comfy and not too tight so as to make it restrictive.

2. Once you have pinned lining for both feet remove your foot and trim along the line of pins.  Then sew this line with a neat running stitch.

3.  Check that your lining sock fits your foot once it has been sewn and all pins removed. Repeat steps 1 & 2 with your outer layer of fabric ie felt, wool or something that will keep you warm.  Because I was using a cardigan I simply used the sleeves as the top of the slipper sock. I inserted my foot into the sleeve and pinned the shoulder area of the arm round my foot using the pre-formed sleeve edge as a neat top to my slipper.

4. Now you want to turn the outer sock so that the seam is inwards and leave the inner sock so the seam is facing outwards.  Now insert the inner sock into the outer sock.  Fold the top of the inner sock down so that all raw edges are hidden and stitch along this edge.  My socks sat neatly at the top but if yours are too loose you can add a stretch of elastic around the top of your sock to hold them up.

5.  I used wool and simply did some stitches to create a face.  This is an area where I'm sure every one of you can out do me on free hand creative skills but I have to admit I am quite fond of my little faces.  I'm considering adding some ears!

6. Now the next step is where I discovered a new product
According to google this works perfectly to enable you to create non-stick treads - so yesterday I popped off to John Lewis and spent £2.40 on a bottle of this.  It takes a long time to dry and I would recommend allowing a little longer than the specified 24 hours - particularly now that the weather is so cold.  But its pretty effective and has turned my quick slipper sock upcycle into a much more finished and less slippy project.

With some practice I think you could get quite fancy with the designs you used as treads - I played it safe on this occasion and just went for splodges focused on the toes, ball of the foot and heel.

All in all this project has been a fun one and I enjoyed pinning my feet into fabric and stitching to create slippers out of a ruined cardigan.  I'm now trying to decide what to do with the rest of it!

Have fun stitching and please do share your adventures with me!  If you send in some pics I'll do a section featuring all of your designs.
x