Showing posts with label tutorial. Show all posts

Friday, 29 May 2015

Upcycled Jeans

I am a great lover of charity shops but every now and then the bargain price tag and time constraints add together to equal hasty decisions.  I bought a pair of jeans over a year ago in a charity shop for about £3.  I jumped at them because they were flares and I can't resist a good pair of flairs.  Only problem was they were a bit short and when I washed them they got a bit shorter! So after a year of never wearing them I finally decided that skinny jeans don't have to be floor length so a bit of a conversion was in order.

So this is where I started - a fab pair of jeans but way too short for me!
 I turned them inside out and unpicked the hems of each leg.  This is really important as skipping this step leaves an untidy finish.
Once I did that I marked out where I wanted the trouser leg to be.  At this point I measured so that I took the same amount of fabric off on the inside leg of both legs and then again the outside leg of both legs.


And then comes the moment of being incredibly grateful for my overlocker.  On jobs like this it makes things so simple and so much more professional but in half the time.  If you don't have an overlocker you will need to use an overlock stitch on your machine.  A french seam is not going to work on heavy denim and certainly not for skinny jeans.
At this point I tried them on and made a couple of adjustments.  
 Then re-fold the hems back up exactly as they were.  The denim here held the creases perfectly so not measuring required I just followed the lines that were already drawn out for me,  Then I sealed off the overlocked stitch at the top of each seam.
And there you have it a new pair of jeans that I can actually wear!  Perfect with some ballet pumps . . 


 or a chunky pair of Doc Martens.

 As much as I hate to let a good pair of flares go I know that there are plenty more charity shop treasures to be had and these trousers will get much more use.
 I love a good upcycle :) 


Saturday, 2 May 2015

The shirt dress

So after posting a dress out of a old shirt that I made on facebook a lot of people commented so I thought I'd share the process.  The idea came from seeing a similar picture on the page below.

https://www.facebook.com/CreativeIdeass?hc_location=stream

So I started off with a mans shirt - this idea works great for recycling as all the parts of a shirt that wear and look old like neck and sleeves you cut off leaving behind perfectly good fabric.  As I'm quite tall (5ft8")  I would wear mine as a tunic rather than a full dress so you want to ensure the shirt you choose is a size that means it is as long as you want it.  If its too long that's easy as you just turn it up but too short is harder to fix!

For this you will need a shirt, a measuring tape, pins, thread, scissors and a sewing machine/needle.  A machine will make it a lot quicker but there is no reason why you can't do this by hand.

Wednesday, 22 April 2015

Slouch cardigan

A lovely afternoon spent wandering resulted in me discovering some fantastically blue fabric in a charity shop.  It was reduced to only a pound so I went for it and began to plan the fabulous things I would make from it.  Pinterest to the ready and off I went.  I found this fantastic pattern for a super comfy slouch cardigan. If you decide you fancy giving it a go you can find the pattern here from True Bias.

The pattern seemed pretty straight forward so off I went - 2 simple rectangles, a bit of shaping and I find myself already at the sewing machine.

It really was nice to just have to cut this much out before sewing.
As I got to work I realised how much this fabric would fray and actually a much more complex pattern might have been a nightmare to work with.  This is what my overlocker looked like after a few seams being done. Super fluffy!


Thursday, 28 November 2013

Bunny doorstops

Now I have finished my craft fair and a few other bits and pieces it leaves me open to concentrate on projects that I have promised to friends for a long time.
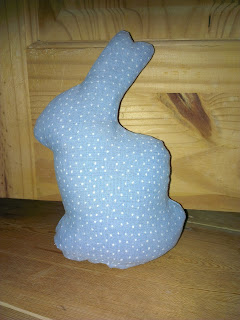
 A friend asked me a month or so ago about making my bunny softies in to doorstops.  We agreed some fabric and off I went to forget about it for ages until finally today I found some time to have a play!  Luckily I had half done this one already so no need for my sewing machine!
 So how did I do it?  I took the template that can be found here and cut out the fabric of my choice and a lining fabric.  I then made an oval out of both my lining and my choice fabric.  The oval needs to be the length of the base of the bunny from toe to tale :)

Then I simply placed the choice fabric right sides together and stitched round placing the oval between the toe and the tale.  I left a full line between the toe and the tale open on one side.  I repeated with the lining.

Then I had a bit of a fiddle - first filling the lining with rice, giving up on that and attempting to skip the lining and then going back to my original plan. So I put some rice into my choice fabric right up to the ears to maintain the shape and then slotted the lining inside. I poured in rice until it was pretty full and then I had stitched the lining closed.  I then added some extra rice into the cheeks of the bunny and around the neck to stop it from slouching down when the rice in the lining shifted position.  I lined the base of the bunny with pennies and then folded over the fabric and stitched tightly together.
This is the finished product.

To be honest once I have fiddled around some more I may well end up making my friend a new one as this is by no means perfect but as a first doorstop attempt I am pretty happy with it.  I can see why so many doorstops are one block like shape with an image sewn on rather than a shape as it is pretty tricky to shape it correctly.

In my house rice and a few coins are plenty heavy enough but if you lived in a house that had self closing fire doors I think it may not quite be enough and you would need to use something like sand that had more weight in it.

Have you got any unusual doorstops?  Or ideas for the next one I make?  Let me know :)
x

Tuesday, 5 November 2013

Slippers!

As the weather has started to turn colder I realized that my slippers are well and truly worn through.  So I decided to make my own.  They turned into more lined slipper socks than actual slippers with a sole but to be honest I'm pretty happy with them!  I realize more and more that I love turning something that is previously useless into something cute and useful.  I bought a cardigan from a charity shop for £2 some time ago.  I loved it but despite taking care to put it on a woolen cycle at a low temperature I managed to shrink it to the point of looking ridiculous when I attempted to wear it.  The shrinking had made the wool kind of felt like so I decided this was my perfect slipper material.

So this is where I started and where I ended up.


So how can you make your own?  To be honest this really was a simple project - I didn't measure anything and simply used the shape of my foot as a guide - not so helpful if you want to make them as gifts but for this project it was perfect for me.


1. I chose a lining fabric - I used a stretchy t-shirt fabric that I had - and fold over your foot pinning along the bottom.  The fit should be comfy and not too tight so as to make it restrictive.

2. Once you have pinned lining for both feet remove your foot and trim along the line of pins.  Then sew this line with a neat running stitch.

3.  Check that your lining sock fits your foot once it has been sewn and all pins removed. Repeat steps 1 & 2 with your outer layer of fabric ie felt, wool or something that will keep you warm.  Because I was using a cardigan I simply used the sleeves as the top of the slipper sock. I inserted my foot into the sleeve and pinned the shoulder area of the arm round my foot using the pre-formed sleeve edge as a neat top to my slipper.

4. Now you want to turn the outer sock so that the seam is inwards and leave the inner sock so the seam is facing outwards.  Now insert the inner sock into the outer sock.  Fold the top of the inner sock down so that all raw edges are hidden and stitch along this edge.  My socks sat neatly at the top but if yours are too loose you can add a stretch of elastic around the top of your sock to hold them up.

5.  I used wool and simply did some stitches to create a face.  This is an area where I'm sure every one of you can out do me on free hand creative skills but I have to admit I am quite fond of my little faces.  I'm considering adding some ears!

6. Now the next step is where I discovered a new product
According to google this works perfectly to enable you to create non-stick treads - so yesterday I popped off to John Lewis and spent £2.40 on a bottle of this.  It takes a long time to dry and I would recommend allowing a little longer than the specified 24 hours - particularly now that the weather is so cold.  But its pretty effective and has turned my quick slipper sock upcycle into a much more finished and less slippy project.

With some practice I think you could get quite fancy with the designs you used as treads - I played it safe on this occasion and just went for splodges focused on the toes, ball of the foot and heel.

All in all this project has been a fun one and I enjoyed pinning my feet into fabric and stitching to create slippers out of a ruined cardigan.  I'm now trying to decide what to do with the rest of it!

Have fun stitching and please do share your adventures with me!  If you send in some pics I'll do a section featuring all of your designs.
x


Friday, 25 October 2013

Pillow case to skirt


My love of making clothes/bags/gifts or anything really out of other abandoned things came more from a love of beautiful and unusual fabric than anything else.  My passion grew into a desire to see less waste and a choice to try to dress in more ethically sourced clothes.  On a tight budget and working for a small agency having just returned to the UK from a few years away I began to find treasures tucked in charity shops.  I realized what great outfits could be conjured up from a scrap of fabric, an old bed sheet or a discarded dress being sold off extra cheap because of the gaping hole in the shoulder.  And so my love of colours, sewing, fabric and clothes grew – and I spent many a weekend  nestled away cutting, pinning, gathering and sewing to make all sorts of creations.

So today I’m setting you a challenge.  Delve into the depths of your linen cupboard, head to your nans to rummage through hers or go on a charity shop/jumble/car boot sale rummage in search of the funkiest pillow case you can find.  I usually find you can pick one up for about 50p sometimes a bit more for a pair.   Today I found a matching pair for 60p – bargain!

And out of this you’re going to make a cute, gathered skirt!

What you need . . .
  • A pillowcase (2 for sizes more than UK14) in a pattern you love
  • A plain pillowcase or piece of fabric of similar size for the waistband (because I am using a pair I used the other side of the pillowcase)
  • A ribbon or strip of fabric that is about 15cm wide and 30cm longer than your hip measurement
  • Dressmakers pins
  • A sewing machine or a needle
  • Thread
  • An un-picker (not essential but helpful in any task involving salvaging fabric)

SIZING
Measure around your hips (or waist if you prefer to wear your skirts there)
Take that number and make a note of it.  We will call that number X.  Now follow the formula below.
X ÷2 = Y
Y + X = T or the total length of fabric you will need
T ÷ 2 = F or the length your two pieces from step 2 need to be.

So let's go . . .

1. U npick the stitches that are holding the pillowcase together and pull
out all loose threads. Trim the edges that are unusable from
 previous stitching but try to only cut off what you have to.


4. Now set your machine (if you’re using one) so it is set to sew the longest stitch.  Using this setting sew along the top of the fabric two parallel lines ensuring they do not touch and are around 1 cm apart.  Ensure you leave threads at the start and end of your line of stitching that you will be able to get hold of. 


6. Now you have your gathering you need to take the measurement you took earlier-figure X - and ease out the fabric to equal that measurement.  Leave 4cm extra as this is where you will sew your seam.  Use your fingers to spread the gathering out so that it is even and the correct size for you.


9.  Now choose your fastening – I have done mine with a tie at the top to finish and a zip but you can add a button, zip or hook and eye – whichever suits you.  If you choose a tie just extend the waistband to a length that means you can tie a cute bow.
Take the open seam and put right sides together – do a straight stitch right up to where your fastening is.  If you have put in a zip this is where you would add it.  I will add a tutorial on how to insert a zip next week.


So there you have it a skirt sewn from a pair of pillow cases for only 60p!  Plus a happy day spent sewing!


Next week I'll do a tutorial on how to add in a zip so that if anyone chose this to be their fastening there won't be any confusion!

Happy sewing :)
x


Sunday, 13 October 2013

Pleats tutorial

Hi all
What a rainy weekend it has turned out to be!  I have spent much of my time at work so am hoping it will rain itself out as I head towards some much needed time off!  Though I would take some time this morning to blog my tutorial on pleats.

I love pleats - they are cute and look gorgeous when done right.  I love the shape they add to clothes and as you saw in my last post I've started to use them in bags as well.  They can be adapted to any style you like and any shape or size so for me it is a must in your stash of sewing skills.

So what will you need - your fabric of choice, dress pins, a tape measure, tailors chalk, iron and a needle/sewing machine and thread.

1.  You need to measure the length of your fabric and decide how big your pleats will be.  I chose 2cm pleats to be every 4cms.  This means that in total I will need 10cm per pleat because the fold uses 3x2cm of fabric.  To work this out for your pleats take the size you chose for your pleat, times it by 3 and then add this figure to the gap you want between pleats.  I marked this out along the top of the fabric using pen so you can see it but you will want to use tailors chalk that won't mark or run ink over your fabric.
So I have marked 0cm then 4cm then 8cm then 10cm.  Then I repeat this again until I reach the end of the fabric.

2. You now want to start folding the fabric to create the pleats.  You want to take the 8cm marking and bring it over the the 4cm marking
This should mean that the 10 cm marking sits just on the fold leaving you with a neat 2cm pleat.  Pin this with the pin pointing up towards the edge of your fabric.  Then you repeat the step taking the 8cm back to the 4cm and pinning until you reach the end of your fabric. You should be left with something a little like this.
As you can see it creates a nice curve to the fabric which is why pleating is often used for skirts - it perfectly sets up the waist band.

3. Now you want to press this out.  This is a really important step if you want your pleats to sit nicely.  The fabric should naturally show you how long the pleats fall - if you want a full pleat all the way to the bottom of your fabric you need to ensure you measure the pleats all the way down otherwise they will loose some of their shape.

4. Finally you run a straight stitch along the top of the fabric and remove your pins.  While you are sewing check that the pleats aren't folding up under your machine foot (if your using a machine) and adjust as you got to ensure they are going through the machine perfectly flat.

Now you add this to your skirt or bag or whatever it is that you are using it for.  This is a skirt that I made a year of so ago out of round table cloth.  I used pleats to bring it in to fit me at the waist and it gives the skirt such  a full feel - perfect for twirling I have to say :)

If you decide you want to do box pleats you follow the same idea except you turn the folds round.  SO the first fold you would bring the 8cm to the 4cm mark.  Then you would swap and bring the 4cm to the 8cm and continue alternating to create a boxed look on your product.

Have fun experimenting and as always give me a post of anything you produce!


Sunday, 22 September 2013

oven mitt tutorial

This week I have been trying out a new pattern for me and making some oven mitts/pot holders.  It was all a bit of an experiment to be honest but I did a very wonky test run - got positive feedback so thought I would run a few up to sit on the table at an upcoming craft fair.

I got myself completely organised and set up a little production line so that I would - in theory - be super duper time efficient.  Unfortunately I wasn't as organised as I had thought and only had enough wadding for my test run and 2 more mitts.  So I did that many and will have to return to make the others later.  I'm proud of my good intentions but may have to work a bit harder on the pre-planning bit :)

If your going to do this project you will need

thread, patterned fabric, plain backing fabric, wadding, shape templates (can be printed out from internet), scissors, bias binding that compliments your patterned fabric and some pins.  I think this one is easier if you have a sewing machine but certainly doable without!

So this is how I did it:

I printed out templates of the shapes I had chosen - heart, star and flower onto plain paper.  I only have an A4 printer so made the shapes into halves and printed it this way.  I laid the straight edge onto the fold in the fabric, pinned and cut out.


I then repeated this step for backing fabric and wadding.  I then cut the backing fabric out a second time but this time cut the shapes in half along the fold line.

I laid the fabric in the order I wanted baking fabric then wadding and then pattered fabric and ironed. This is an important step as it causes the wadding to compress which makes it much easier to manage when sewing and cutting a fiddly shape.

Then take the two halves of the backing fabric and edge the straight seam.  I did this by over locking it and then folding over and running a straight line stitch along it.  When you do this ensure that you fold over on both halves the same side.  When you lay the two halves onto the back of your shape you should see no raw edges on either side.

Now pin together and run a straight line stitch all the way around the edge of your shape trying to ensure you catch all the layers into your stitch.

Once you have done this trim with scissors as close as you can to your line of stitching.  Remove any excess threads or pieces of wadding that are sticking out around the edges.

Now take your bias binding and fold around your shape.  This is the trickiest bit and requires you to take it slowly and ensure the binding is tucked tightly around the shape.

It should look something like this now.


As you can see I added a loop of fabric to the corner of each so that the mit could be hung up in the kitchen.  The idea of these is that they fold in half and your hand slips into the pockets.
 Trim all your edges and check carefully for if there are any sections of bias binding that you have missed with your line of stitching.  If there are you need to neaten that section up otherwise the mit will begin to look untidy very quickly when used.

So there you have it - a cute mit for handling those hot pots and pans.  I think it would brighten up a kitchen but is also a cute idea for a gift.

I found that the flower became very tricky because of the tight curves so I kept sewing the bias binding without all of the layers in it when I hit the corners.  I'll keep trying but didn't end up with a neat enough product to photograph this time.  Maybe next week!

As always I have made these out of reclaimed fabrics so they are ethical and environmentally friendly.

Happy stitching :) 


ps. it was lovely to climb up into my organized craft room this weekend so I have many good intentions to become an organised crafter - watch this space :) 


Wednesday, 28 August 2013

Productivity!

Today has turned into a pretty good day.  I had some time off just for me - yay - and last night was thinking I wouldn't be able to fit everything in as well as spend some decent time up in the attic sewing.  I woke up this morning and decided to just try and do everything.

  Out the house by 8am for a quick run (quick as in short not really very fast at all I'm afraid) and home again to clean the house and shower.  I sorted what felt like a mountain of laundry and jumped on my bike to pop round the charity shops.  Surprisingly this mission was due to a lack of clothes that fit me these days rather than my usual fabric hunt so the hunt for jeans began.  4 shops later and I had 2 new to me pairs of jeans and 2  tops - quite enough for one day.  Looking at what I have bought reminds me that there is really no reason not to get stuff 2nd hand.  It's ethical, cheap and you find some fabulous things.  This is one outfit I bought today which in total cost me £7 - I mean really! I have to admit I'm so happy I have a really fabulous pair of flares again!  I love them so much more than skinny jeans!


After that I picked up some food shopping and popped into Akrams Oriental Supermarket to stock up on spices and Tabasco and I wobbled home on my bicycle - just a tad over loaded!

Lunch at home with fresh rocket snipped from my garden today left me feeling super duper happy that I am actually able to eat something that I have grown!  Which led me perfectly to heading upstairs to nestle myself away in the attic and sew.

The sunshine has been shining so brightly today and as I was sewing it poured in through the slanted windows - combine that with a gentle breeze and how could anyone not be inspired to create lovely things.

I finished off a few projects that required completion and then turned my attention to some fabric I picked up a few weeks ago courtesy of my local Sue Ryder shop.  And this is what I made - a fun skirt with a simple smocked waist band.


 If you fancy making it just follow the directions for the kids summer dress.  Just replace the chest measurement with your waist/hips and make the skirt as long or short as you want it!  Follow this link to bring you to that tutorial!
http://daydreamsandsunshine.blogspot.co.uk/2013/07/summer-dress.html

So my conclusion is that sometimes the more you get done the more productive you become!  More busy definitely did make more time today!

Well happy sewing and as always post me some pics of your work and I'll share them on the Facebook page!

Sunday, 25 August 2013

Pillow Case to Tote Bag


I’ve been trying to use up the fabric that I have had in my boxes for a long time and came across a gorgeous pillow case that I discovered months ago hidden deep in mounds of bedding in a charity shop.  I loved the colours and the flowers but wasn’t really sure what I was going to make out of it.

This week I decided to make it into a tote bag – some stitching and lining later and I ended up with a finished product that was so much better than the pillow case I’d started out with.


Tote bags are great for days out in the sun, trips with the family and carrying as a shopping bag.  If you make them out of recycled fabric then not only are they preventing the use of plastic bags but ethically and sustainable produced too.  Combine that with a relaxing afternoon spent sewing and you have a sustainable, ethical and fun filled bag!

Get those machines out and get sewing!

1.        Decide how big you want your bag to be and cut two rectangles 1.5cm bigger than that all around.  Cut out two rectangles of the same size from a plain lining fabric.   Then cut two long strips that will make up the handles.  I did mine either side of the pillow case and to a 6cm width

IMAG0607.jpg


2.       Now place the large rectangles right sides together for both the patterned and the lining fabric.  Sew both sides and the bottom of the fabric.  Now turn these out so that you can see the pouch that will make up your bag.


3.       Take the thin strips and fold them in half lengthways.  Sew a line from top to bottom about 1cm away from the raw edges.  Take a safety pin and pin it to one side of the fabric.  Point the pin into the tube of fabric and begin to ease it through pulling the fabric gently as you go.  This should thread through leaving you a tube of fabric with the right side facing you.

IMAG0608.jpg

4.       Press your handles, bag and lining to leave neat, crisp lines.


5.       Place the lining so the raw edges are facing you and put it inside of the patterned fabric.  All your raw edges should now be hidden.  Fold the tops over to create a neat seam between the patterned and the lining fabric.  Pace the handles flat about 4cm away from each edge and tuck them in between the lining and patterned fabric.

IMAG0609.jpg

6.       Pin and ensure everything matches up and sits as you want it to.  Make any adjustments and  then stitch a line around the top of the bag ensuring you stay the same distance from the top as this is a visible stitch.


IMG_20130822_091714.jpg And there you  have it - just trim your loose threads - your finished product!